Demystifying Log Formats: What Every Aspiring Colorist Needs to Know
One of the most exciting consequences of the advancement of technology is the democratization of tools that were once reserved for big-budget productions.
Of course, this applies to the cameras we use, as well. Action cameras, like those from GoPro and Insta360, allow for shots that were never possible before, in conditions that would bring any camera of yesteryear to its knees in a heartbeat. And who would have thought that just about every one of us would be carrying around a tiny device that can shoot video good enough that the manufacturer substituted them for high-end cinema cameras during a launch event for some of their other products?
On that topic specifically, one of the headline features of the iPhone 15 Pro Max is, of course, its camera. Many of the specifications are those we’ve come to expect from a modern iPhone – 4K HDR video, excellent image stabilization, the list goes on. But one feature stands out among the others, that being its ability to record video with a log curve applied, a first in the smartphone world.
If you’re new to the video world, this is a feature you may well never have heard of before. In a nutshell, a “log curve”, short for “logarithmic curve,” is a special way of encoding the data captured by the sensor in order to preserve as much dynamic range (the difference in brightness between the darkest and brightest parts of an image) as possible.
Clipping and Dynamic Range
To fully appreciate what makes a log curve so important, it’s vital to understand what a log curve is trying to prevent in the first place – clipping.
Clipping is what happens when something, whether that’s a camera, a monitor, or even a piece of software, is asked to handle or display an image with color or brightness values outside its limits. In camera terms, each individual pixel on the sensor can only report so much light hitting it before it saturates and reports its maximum value (often called “blowing out”), or so little light hitting it that it’s below its detection threshold and thus reports no signal (called “crushing”). Critically, any contrast or color that may have existed in clipped areas is gone and not recoverable, because pulling down white and lifting black just gets you closer to middle gray.
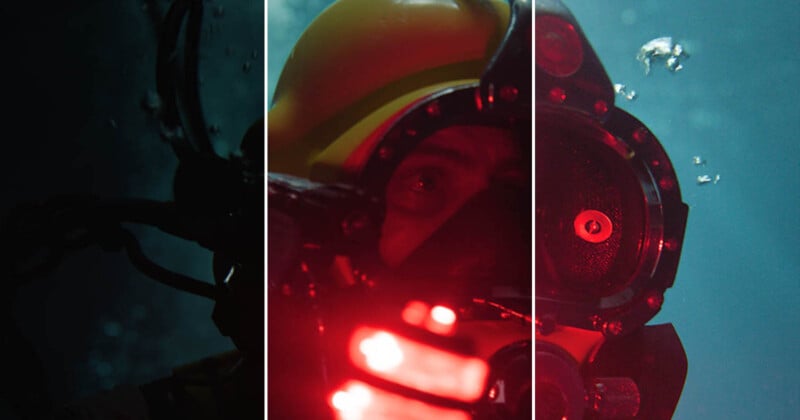
Dynamic range is a measure of how much information can be stored in a photo or video without clipping, specifically the difference in how dark the darkest areas are and how bright the brightest areas are. It is a crucial component to the perceived quality of an image and is a specification that many camera manufacturers tout as an indicator of a professional-grade system, usually measured in how many stops of light it would take to get from one end of the scale to the other. For example, the Arri Alexa 35, considered by many to be the current gold standard of cinema cameras and the yardstick by which all others are judged, sports a whopping 17 stops of dynamic range. This means that a director or cinematographer can pull off some incredible shots, like the one below.
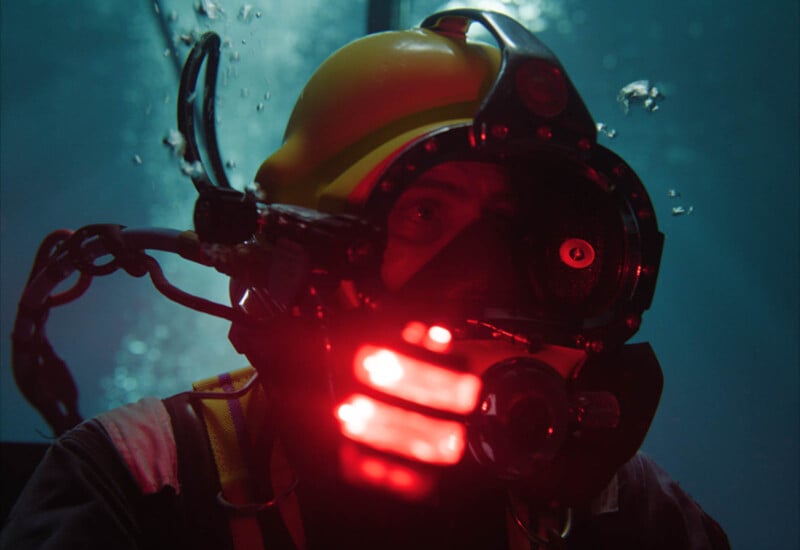
This image, taken from Alexa footage, already looks great. However, we can see that the brightest areas and darkest areas have both lost detail due to clipping. An SDR (standard dynamic range) monitor can only display around 8 stops of dynamic range, which means that any luminance information outside those bounds has to effectively be discarded and shown as either pure black or pure white.
However, that does not mean that the source file itself is subject to the same limits.
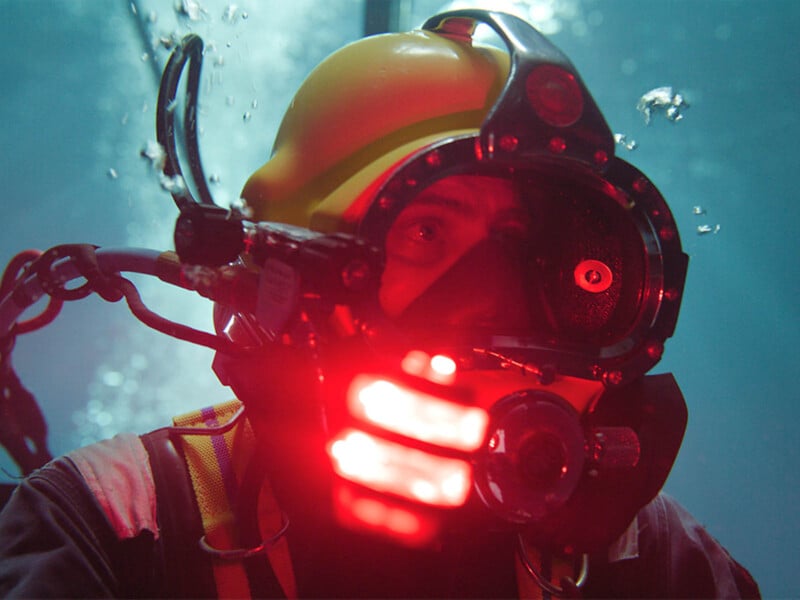
Thanks to the extremely wide dynamic range of the Alexa 35, a colorist has a great deal of wiggle room when it comes to pushing and pulling the image. This still has been graded to give more detail in the darker areas, which we can see in the additional detail evident inside the diver’s mask and on his outfit. Of course, the compromise made is that the bright lights on the front of his helmet clip and lose detail, since we are still bound by that 8-stop range of an SDR monitor.
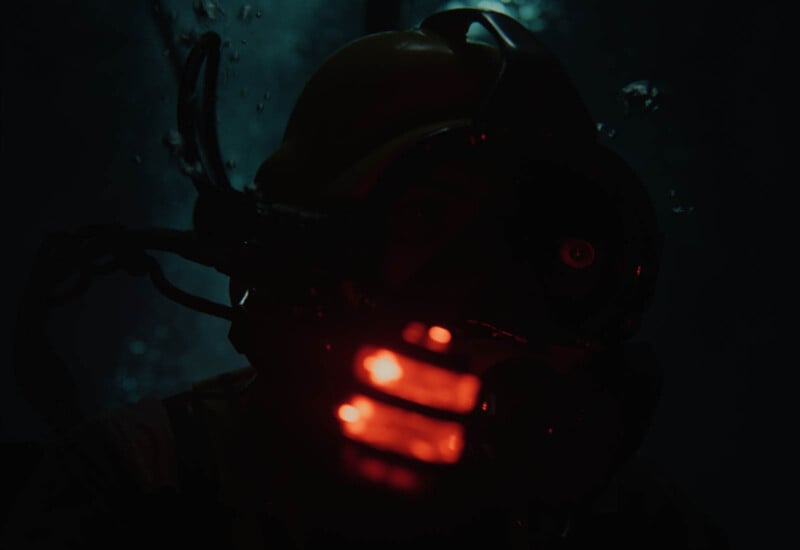
In this still, the colorist has chosen to go the other way and give more attention to preserving the brightest areas. Now, the rest of the image looks very dark indeed, but as we can see, even the brightest parts of the lights have had their actual orange color preserved rather than clipping to white.
If we were all viewing this on a display with a higher dynamic range, and the still was graded to take that into account, we would be able to have the best of both worlds, with good detail in both the shadows and highlights.
Log Curves and LUTs
So what does any of that have to do with a log curve?
Well, as previously mentioned, a log curve is a special way of mapping the brightness of an image so that you can capture more detail in the brightest and darkest parts of an image.
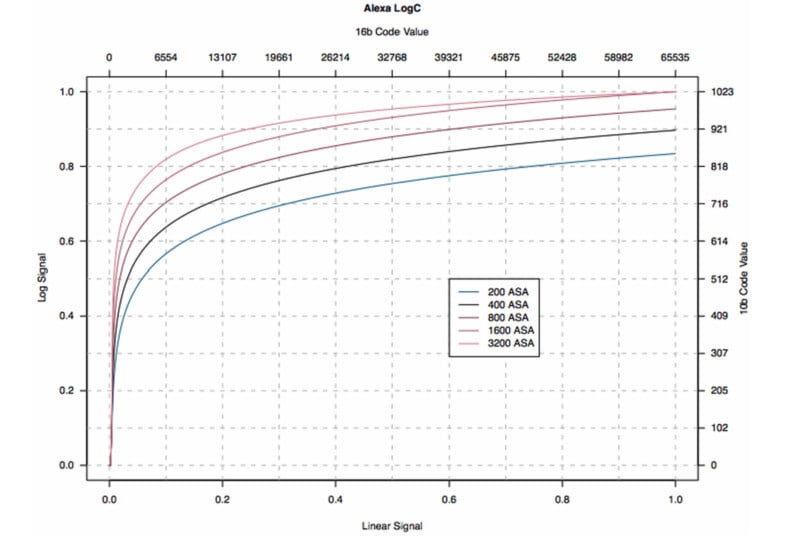
While the above graph may not mean anything to you at first glance, it is a mathematical representation of the way the Arri LogC profile encodes information from the camera sensor. According to this graph, we can see that when using a log curve, the camera is effectively reducing contrast at the very bottom of the “signal” (or brightness) range, and is doing the same at the very top.
We would then expect to see an image that looks very gray and washed out, which is in fact exactly what we see when viewing a log image straight out of the camera. Unfortunately, I do not have access to an Alexa 35 to play around with, since they command prices greater than anyone except the highest-end productions can stomach, but what I do have is a Nikon Z9 with the ability to capture N-log. While the name and exact specification may be slightly different between the manufacturers, the mechanism is very much the same, so we can still get a good illustration of what we’re dealing with.

Anyway, as we can see above, there’s still a good amount of contrast in the middle tones of the image, but the sky and shadows are substantially less defined, going gray very quickly.
Thankfully, because a log curve is simply complicated math at its core, all we have to do to get back to a normal-looking image is tell our editing software to apply a lookup table, or a “LUT”, which effectively reverses that math for us. Every manufacturer should have an official LUT for whichever flavor of log video their cameras use. Canon has a couple of different variants of C-Log, same for Sony and S-Log, same for Fujifilm and F-log. Even the new GoPro Hero 12 Black can shoot in GP-Log, which is awesome for use on a drone or in mixed lighting like I often encounter.
Much better. The only thing I really don’t like about this image is that the clouds in the background look a little blown out to me after using the LUT by itself. Because I recorded in N-Log, though, the detail is still there, and I can use the excellent HDR grading tools in DaVinci Resolve to bring them down without affecting the rest of the image too much.
As you can see, we’ve tamed the harshness of the clouds and brought out a bit more detail, just by tweaking a slider. This is an image I would be perfectly happy with.
Common Pitfalls
Now, let’s talk about working with log footage.
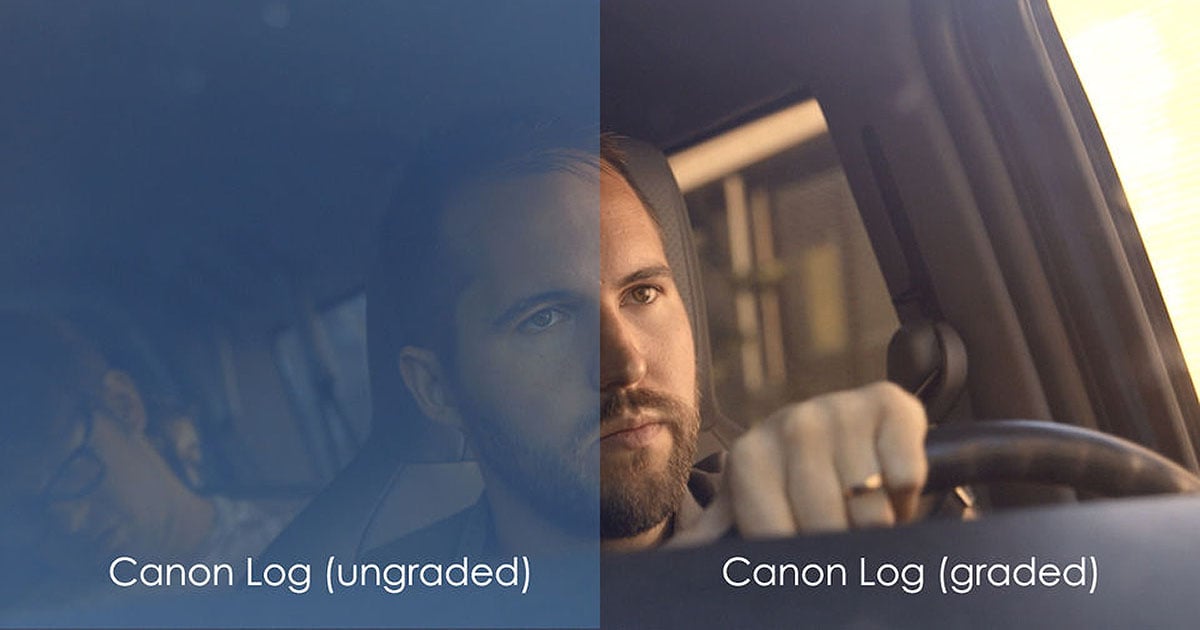
One of the most common mistakes colorists make when first encountering log footage is to treat it in exactly the same manner as they would footage recorded in a “flat” or “neutral” color profile. Many cameras offer this feature to give a more forgiving baseline for doing additional color work in post. While it may look similar to this kind of footage, with low contrast and saturation, it is vastly different.
The vast majority of the color tools available in a suite like DaVinci Resolve or Adobe Premiere are designed to work primarily with linear video data, not logarithmic video data. Cranking your contrast and saturation and calling it a day might get you closer to normal-looking footage, but importantly, the contrast roll-off in the highlights and shadows inherent to log footage will still be there, and will only get more extreme the harder you try to get rid of it with linear tools.
When shooting with log footage, it’s very important to get your exposure right. Some versions of log footage look best when exposed slightly over or under where linear footage would be. These are oftentimes not explicit recommendations by the manufacturer and are instead crowdsourced insights gathered by the community of people around a specific camera. Visit the official forums, Reddit, or YouTube to see if such a specification exists for your camera.
If you’re working with log footage, you’re also probably working at a high enough level that you should be keeping on top of your color management. For people shooting vlogs on a single camera or a phone and just cutting it down to post on social media, this isn’t much of a concern because much of that data is baked in and will not meaningfully change – you’re very likely to be viewing “basic” footage on a phone or a similar device, and that will already have been taken into account for you.
However, high-end cameras designed for more advanced video will often need a bit of help translating their images into footage that will look good on any given screen, with the correct gamma and color space. DaVinci Resolve is famous for its color management workflow, and realistically this is a topic deserving of its own article, but suffice it to say that you should be double-checking that your footage is being correctly translated into the output settings you need. Rec. 709/Gamma 2.4 is very common, but do your research on which specs are best for a given use case.
Closing Thoughts
Log footage being available in devices like an iPhone or a GoPro is just another example of the idea that we as creators are living in a golden age of creativity and self-expression, in which the tools of professionals can now literally fit in the palm of our hand. Of course, with that great power comes a great responsibility to know how best to use them in order to do both your tools and yourself the justice they deserve. As with all things, the best way to familiarize yourself with your limits is to test them, to explore what you can create. I’ve shot plenty of footage that I would pretty unequivocally call “bad”, but trial-and-error is key. I just hope I’ve helped to maximize the trial and minimize the error.