Cleanup.pictures: How to Easily to Remove Objects From Your Photos
![]()
Removing unwanted objects and text out of an image to clean up your photo used to require special software and skills, but these days AI has led to features like Content-Aware Fill in Photoshop that lets anyone do it in just a few clicks. If you do not have a Photoshop subscription, there is a free Web and mobile app called Cleanup.pictures you can use.
Table of Contents
An Introduction to Cleanup.pictures
In photography, there’s a careful balance between the elements that you want in your image and the elements that you want to leave out. Growing your photography skills requires attention to this balance, but it’s not always possible to achieve your desired composition. There are often unavoidable artifacts, such as people or background objects, that distract from the image’s main intent. Luckily, there are powerful tools such as Cleanup.pictures to help post-process these images.
Cleanup.pictures is, at a basic level, a free website and app that enables you to remove elements from an image. The website is accessible by visiting “Cleanup.pictures” using a search engine, and the feature is available in the iOS app ClipDrop.
When you first visit the website, the tool’s ease of use is clear. If you want to get started right away, you can simply upload an image from the site’s home screen by dragging and dropping or searching your files.
![]()
If you don’t have an image but you still want to test its functionality, Cleanup.pictures has a few example images available for you to test with. The app is similar in its simplicity, and it is packed with quick, powerful removal features.
A Powerful Freemium Tool for Object Removal
The free version of Cleanup.pictures currently has no limit on the number of images, and export resolutions are limited to 720px on the longest side. This is suitable for some social media platforms, but not suitable for print at reasonable dimensions with today’s printer resolutions.
The paid (Pro) version is $48 per year or $5 per month, though you can sometimes (such as at the time of this writing) find it on sale for $24 per year. This has no limit on the number of images, no resolution limit, and provides access to a high-quality refiner.
If you’d like to try Pro on your own images, there is currently a two-week free trial available.
Read on for step-by-step guides on how to use both versions of Cleanup.pictures to remove unwanted elements of an image.
How To Use the Cleanup.pictures Web App
Let us see how the Web app can be used to remove the white fence from this landscape photo:
![]()
Step 1. Visit the easy-to-remember URL Cleanup.pictures (or search for “cleanup pictures” using a search engine if you forget).
Step 2. Look for the box that says “Click here or drag an image file.” Use this to upload your desired image.
![]()
Step 3. Once you’ve uploaded your image, the brush module will open. From here, you can change the size of your brush, zoom in to refine smaller objects, see before & after versions, and toggle between high definition (Pro) modes and the standard definition.
Step 4. Select a brush size that is appropriate for the element that you’d like to remove. Generally, it’s a good idea to have a brush that’s slightly bigger than at least one dimension of the element you’re removing, but you can experiment to find what is best.
![]()
Step 5. Paint over the element(s) that you would like to remove and wait for Cleanup.pictures to work its magic. (Important: If you’re using Pro mode, you’ll need to press the “Clean HD” button to the right of the brush size module when you are finished with your selection.) The removal step can take a few moments.
![]()
![]()
Step 6. View results. If you’re not happy with the outcome, press the “Undo” (arrow pointing left) button next to the brush size module. Try making a larger or smaller selection of the element that you’d like to remove until you have results you’re happy with. Keep in mind that some elements are harder to select and remove than others (i.e. removing a blue dot from a white background is much easier than removing a watch from someone’s wrist).
![]()
Step 7. Once you’re finished removing elements, press the “Download” button in the upper right to download your image. If you’re using the free version, keep in mind that the size will be limited to 720px on the longest side.
![]()
Here’s a before and after look:
![]()
Cleanup.pictures did a great job removing the fence in this image, and it only took a couple of selections to produce a great result. The zooming feature really helped in this example, and it allowed for the details of the fence to be selected.
How to Use the Cleanup.pictures App
Now let’s see how we can use the same technology in the ClipDrop app to remove the pole and flood lights from this photo of a house:
![]()
Step 1. Install the ClipDrop app from the iOS App Store.
Step 2. Under “Start from a photo,” select “Cleanup Picture.”
![]()
Step 3. Choose the image that you’d like to work with.
Step 4. Once you’ve selected your image, the cropping module will open. Use this to crop your image if you would like.
![]()
Step 5. Toggle between HD and SD modes in the cropping module. According to the Cleanup.pictures FAQ, a Pro subscription should work on both mobile and desktop versions, but reach out to Support if your Pro subscription doesn’t show up on the mobile app after signing in.
Step 6. Press “Continue” to open the brushing module. In this module, paint over the element(s) you’d like to remove and wait for Cleanup.pictures to work its magic. This step can take a few moments, so be patient.
![]()
Step 7. View results. If you’re not happy with the outcome, press the “Undo” (arrow pointing left) button next to the “Save” button in the upper right. Try making a larger or smaller selection of the element that you’d like to remove until you have results you’re happy with. Keep in mind that some elements are harder to select and remove than others (i.e. removing a blue dot from a white background is easier than removing a watch from someone’s wrist).
Step 8. Once you’re finished removing elements, press the “Save” button in the upper right to save the image to your camera roll. If you’re using the free version, keep in mind that the size will be limited to 720px on the longest side.
![]()
Here’s a look at the before and after:
![]()
This post-processing yielded fantastic results in just a few minutes. The most incredible edit was removing the light post and keeping most of the features of the house intact. This selection was done using an iPhone and fingers to paint the desired area, but using a larger screen such as a tablet and a stylus would make this even more accurate.
More Examples of What Cleanup.pictures Can Do
Here are some other before-and-after results we were able to get using example photos in Cleanup.pictures.
Sports


In this example, distracting signs were removed from this image of a skier. This process was as simple as making a few selections and pressing the “Clean HD” button. Notice that Cleanup.pictures did a good job with the signs surrounded by complex trees.
![]()
Orchestra


The microphone was the most distracting element in this image, and it was removed quickly along with the other specks in the background. Additional refinements could be made to help clean up the texture inconsistencies in the background, but this quick selection works for many circumstances.
![]()
Graduation Portrait


This is a good example of a very difficult scenario. The garbage cans on the left side of the image are noticeable, yet their background is very complex, so it’s fairly hard to remove them and replace them with a “natural” content-based background. Notice how Cleanup.pictures did a great job removing the bike rack and the people, but the trash cans are a little too complicated to fill in with a natural-looking background. This is a reminder that photographers have to work with and accept the limits of software and equipment, as well as pay careful attention to composition.
![]()
Backpacks


In this product shoot, models are walking around a busy downtown area full of distracting elements. For most of the elements that were removed, only one round of selection was used and Cleanup.pictures did a fantastic job. The most noticeable (non-model) person in the image
was removed with ease and impressive accuracy (although the selection can always be refined using a smaller brush and more iterations). Cleanup.pictures really shines when removing text, and the unwanted text all took one fairly rough selection to clean up.
![]()
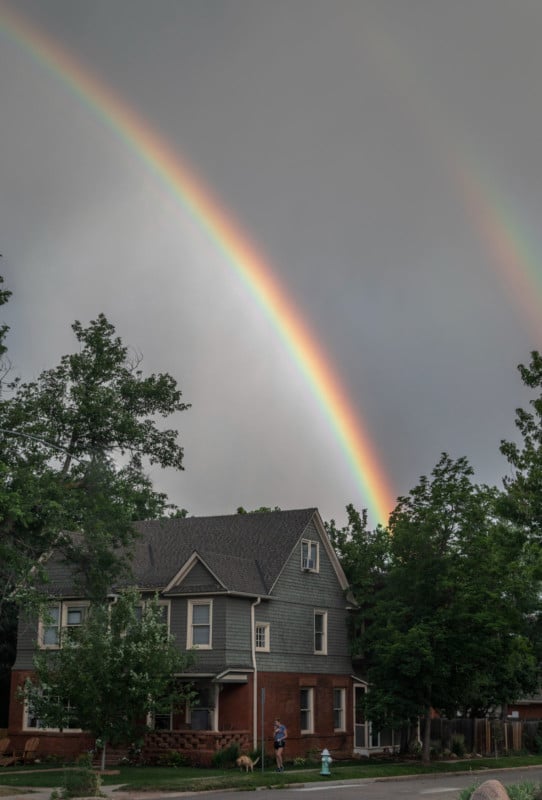
Rainbow


This is a fantastic example of the capabilities of Cleanup.pictures. All of these removals were done with a few clicks. This was a quick selection painting with a mouse, and only one round of removal was done here. The results are astounding, especially for a tool that is browser-based and free to an extent.
![]()
Support Available for Cleanup.pictures
One of the greatest features of Cleanup.pictures is their extensive support. ClipDrop, the creators of Cleanup.pictures, have created a “Community Slack” channel. If you’re interested in knowing more about what’s happening at ClipDrop, asking questions, and more, you can join the Community Slack.
Conclusion
Cleanup.pictures is simple to use, quick, and produces fantastic object, text, and other element removal results. It’s free to use if you don’t need full-resolution, and reasonably priced (even discounted until August) for the full version. Visit Cleanup.pictures using a search engine to test out its capabilities using example images or your own, and start a free trial of the Pro version if you’re interested in testing it further. Convenience is key when it comes to post-processing, and Cleanup.pictures combines convenience with power as an object removal tool.