
How to Whiten Teeth in Photoshop
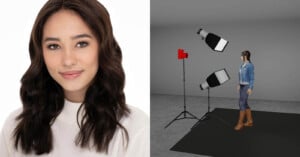
Let’s face it, not everyone who ends up in front of your camera is going to have amazing white teeth like the model in the photo above. There are going to be times when you have a client whose teeth might be stained.
Let’s face it, not everyone who ends up in front of your camera is going to have amazing white teeth like the model in the photo above. There are going to be times when you have a client whose teeth might be stained.
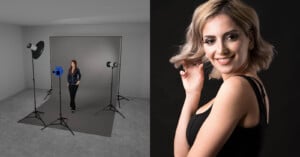
If you shoot headshots and/or portraits, clamshell lighting is something you should definitely become familiar with. This versatile and easy-to-create lighting setup produces a very flattering look useful for a variety of portrait situations.
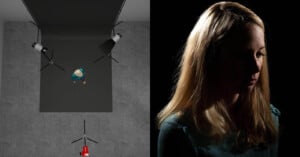
In this article, we are going to take a look at rim lighting. As you might guess, rim lighting is used to light a portion of the edge of your subject. While it is most often used as part of a multi-light setup, it can be used on its own for dramatic effect.
Loop lighting is a very common style of portrait lighting that is seen very often in portrait photography. In fact, if you’ve spent much time at all shooting in a studio, you’ve probably employed loop lighting without specifically trying to.

Butterfly lighting has long been a “go-to” setup for fashion close-ups as well as other portraits where one wants to emphasize cheekbones and frame the face in shadows from below the chin.

Photographers who shoot portraits are likely familiar with Rembrandt-style lighting as well as other styles such as loop, butterfly, and so on. This is especially true if you have taken a lighting class or have been reading up on the subject. You may be using this specific type of portrait lighting in previous images and might not even realize it until reviewing later. (Ask me how I know).
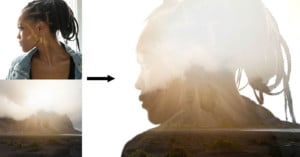
In the past, double exposing film was one of the most popular special effects used in photography, and often could be hit or miss. The idea was to combine two (or more) photos into the same image.

For decades, there’s a piece of gear that I’ve always had in my camera bag. This would be a handheld light meter. I feel I’m in the minority these days by still using a handheld light meter and that’s too bad this is so.

One of the most (seemingly) basic tools in Photoshop is the venerable Crop Tool. Used to cut way portions of an image to only leave the desired area, the Crop Tool might appear to be simply a one-trick pony. However, there is a lot more to here than you might think. In this guide, I’m going to break down the various options for making the best use of the Crop Tool.
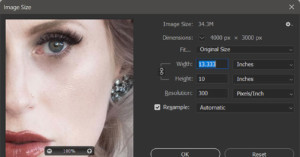
Resizing images in Adobe Photoshop sounds like it should be a trivial and simple operation, and for many uses and users, it is. It’s when one starts looking closely at the details in a resized image that it becomes apparent you should be looking into the options of the resize image dialogue box.

If you have ever uploaded a photo to your social media feed and found that the image quality isn’t as good as you’d like it to be, you're not alone. Most sites that allow you to upload images will use their own set of parameters to resize and compress uploaded images to save file space and bandwidth.
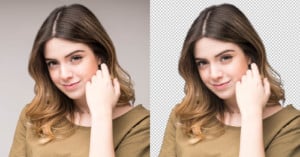
Using Photoshop to remove the background in an image so that you can replace it is one of the most frequent things for which it was used, and might still be. The actual placing of a new image for a background is relatively easy. The heavy lifting comes from making a good selection of your subject as this will be used to remove the unwanted background for replacement.
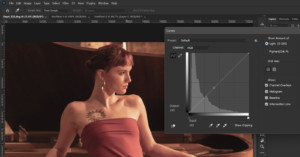
When thinking about the Curves tool in Adobe Photoshop, the phrase “With great power, comes great responsibility” is a thought that comes to mind. Curves is the most powerful tool in Photoshop for adjusting brightness, contrast, tonality, and color.